"Heat Doesn't Rise, and Wood Doesn't Burn"
"Heat Doesn't Rise, and Wood Doesn't Burn"
by Gray Shaw, April 2020
Woody plant waste comes in many shapes and sizes and conditions.
On April 8, we assembled all the brush and wood that Chip had lying around and made biochar. Some of the material was good for starting the fire. Some was acceptable later in the burn. And some was not suitable at all. We also filmed the event, to show others how to make decisions about what to use and how.
Chip was using an Oregon kiln, designed by Kelpie Wilson. This kiln is simply an open box with sloped walls and a drain. Its purpose is to control air flow to the pile so that air only enters at the top. There's a drain plug to empty the water after you quench the fire. You can make a pile on the open ground, and it will work almost as well.
When we arrived, Chip had already loaded his Oregon kiln. But there were problems with Chip's pile. First, the material was not arranged so that the fire could be lit on top and burn down. Biochar piles need small fuel at the top to start, with a gradual size increase as you go down. If you have large material, it should be in the middle so that smaller material below it can help it finish in time. This is upside-down to most people. You probably learned to light a fire at the bottom. Why do we build the fire upside-down? To eliminate smoke and ash, and increase charcoal production. Even if you weren't trying to make charcoal, this way is better in terms of smoke.

Discussing fuel sizes and fire building. This pre-loaded kiln had to be emptied because a lot of the fuel was too big to make biochar at this scale.
Second, there was too much air space in the pile. In a conventional wood fire, flames ignite the fuel above. In biochar piles, we rely on radiation from the burning fuel on top to ignite the fuel below it, and so on down through the pile. You may have been taught that heat rises. Wrong! Hot air rises, but heat radiates equally in all directions. This is how fire spreads through a biochar burn pile. In order to catch, the fuel can't be too far from the burning material above it. There also should not be too big a jump in size between layers.
So we took apart Chip's pile and rebuilt it. Wood over 3" diameter was removed. Branches less than 3" went on the bottom, followed by smaller branches, then twigs, then fine twigs and straw surrounding a paper top knot. The material was closely packed, allowing only enough air space to feed the flames. It really did look like an upside-down fire!
All the material was dry. No green or rotten wood was included at the start.

The rebuilt pile. You could start with a much larger pile, as long as the sizes increase gradually downward with small stuff on top.
Anyone who has built a bonfire knows that green material can be put on after the fire gets going. Biochar burn piles are no exception. However, it slows down the burn temporarily and makes more smoke. The water inside the wood has to evaporate before the wood can burn, and this takes energy away from the fire, which results in smoke. We waited until the fire was really going before adding green material.
Rotten wood can also be added to an established fire. However, rotting is the same as burning, chemically speaking, so there is less fuel left to burn in rotten pieces. The energy released by fire is the same energy that is consumed by organisms eating the wood. You can only burn what’s left behind by the organisms, so you won't get as much heat when rotten wood burns. You'll get more smoke instead. We tossed Chip's rotten wood into the forest, where it will soon become soil. It wouldn't contribute much fuel to a wildfire, either.
I lit the fine material and paper, and we watched carefully as the fire grew. If you've never seen this before, it's really quite interesting. Embers drop through the pile while it's being heated from above, which accelerates the ignition. But because we lit it on top, there was hardly any smoke. We could stand comfortably right next to the pile.

A minute after lighting. Note the absence of smoke!
I gently stirred the fire as it burned downward, to make sure all the wood was ignited. Once the fire reached the bottom of the kiln and flames began to subside, we began adding fuel, a little at a time. When adding fuel, we try to maintain a "flame cap" over the pile by adding just enough fuel to feed the flames. Too much at a time makes smoke. When ashes began to form on a part of the fire, we quickly place new fuel there. We keep this up until we run out of fuel or space in the kiln, whichever happens first. Then we wait until the flames go out and extinguish the pile with water.

Adding and spreading out material in the kiln for even combustion. At this stage, green material can be added.
How does this flame cap work?
Charcoal is what's left over when all the compounds containing hydrogen and oxygen are driven out of the wood as gases, along with some carbon particles. Together, these "volatiles" are what burns as flame. They burn in the air, whereas charcoal burns where it is. As long as we keep air from reaching the wood, charcoal will build up at the bottom of the fire. The kiln controls the air so that it only enters the fire at the top; that's mainly what it's for. The burning flames extend across the top of the pile, forming a cap that keeps oxygen away from the wood. The heat of this combustion keeps driving volatiles out of the wood until they're all released. The flames keep air from touching the wood directly. Smoke is the particles that escape combustion.
In other words, wood doesn't burn. It separates into volatiles and charcoal, which burn separately. In an ordinary fire, of course, some air can reach the wood and the charcoal is burned along with the volatiles, but it still tends to burn last. When your campfire goes out, instead of enjoying the glowing coals, you could stop the fire with water and you'd have charcoal.
We had many different fuels to throw on. Chip had been saving up branches and stems of various soft and hardwood species for awhile, and he cut some green material just for the occasion. We even had an old bamboo screen woven together with wire. The wire was easily removed after the fire was out.
When you make biochar, you want all the material to finish flaming at about the same time. If bigger pieces are added too late, the smaller branches will flame out first and start turning to ash before the bigger ones are done volatizing. It's best to set aside a quantity of smaller material to add at the end, so that any larger unburned pieces can catch up.
Lest you be tempted to burn lumber or agricultural waste, bear in mind that there are prohibitions in place about those. Old pressure-treated lumber contains chromated copper arsenic (CCA), and newer PT lumber still has high copper levels. You don't want that in your soil. All construction debris is illegal to burn. The rule about ag waste is a good thing for the CA central valley, where smoke from burning rice straw used to obscure visibility and injure lungs on I-5. Air quality management districts have not yet made exceptions for clean-burning biochar manufacture.
Leaves and grasses burn too, of course, as long as they're not matted together. Air flow is limited by matting, which causes smoke. Leaves tend to fly off as embers. Just to demonstrate this, I threw on some matted leaves and grass. Once was enough!
At the end, we flooded the kiln to extinguish the burn. When all the coals were out, we pulled the plug and drained the kiln (a nice feature to have). The yield was about 15 to 20 percent of the volume of brush we added.

Extinguishing the fire when all fuel has been added and the flames stop. Kilns can be loaded to the brim, if you have the fuel.
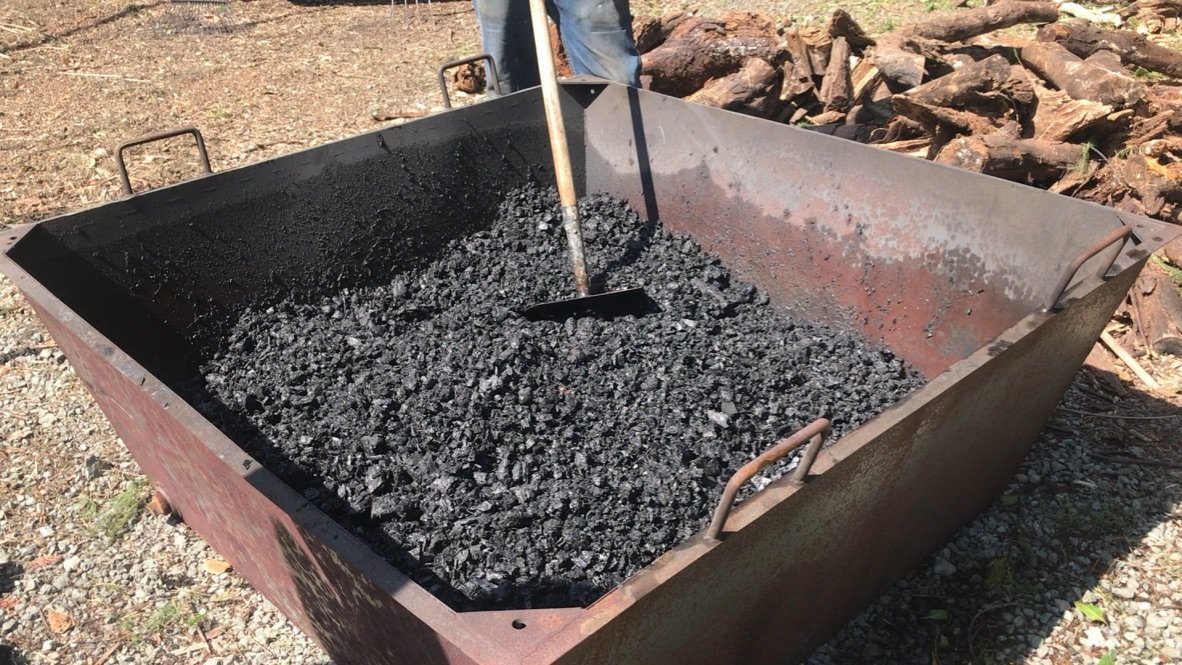
Examining the drained biochar for consistency, removing any partially burned material.
This charcoal will need to receive two treatments before being used as a soil amendment. First, it needs to be reduced in size to 1/4" or less. Larger pieces will not be easily penetrated to the center by water, nutrients, and microorganisms. Second, it should be inoculated with compost, worm castings, or compost tea. Otherwise, it will draw nutrients from the soil, reducing productivity until it becomes fully charged. Generally you will lose a season of productivity to this.
You don't need a kiln to make biochar. Kilns are used to control air flow, which increases production of biochar, reduces smoke, and lets you stand closer to the fire. You can simply make a pile on open ground, being careful to scrape away flammable material down to mineral soil around the pile. You will get about a 10 percent yield. If your primary objective is fuel reduction, the biochar can be seen as a side benefit. All you need for good biochar is biomass and a match. But be safe! Clear your perimeter beforehand, and have water ready.